3 Savory Rhubarb Recipes

Pork Chops with Orange-Rhubarb Sauce and Lovage; Rhubarb Marinated Sea Scallops with Orange-Fennel Salad; Fresh Oysters with Rhubarb Mignonette Sauce

Pork with Orange-Rhubarb Sauce and Lovage

Pork with Orange-Rhubarb Sauce and Lovage

Rhubarb is spring’s own zucchini. By which I mean, even if you don’t have your own patch of rhubarb, chances are good you have a neighbor who is swimming in the stuff every year at this time, and who will eagerly foist some off on anyone who asks. That’s because rhubarb seems to live forever, and most folks who live in old houses in New England have an ancient plot that came with the deed. These well-established clumps produce a huge number of juicy pink stalks year after year without any attention at all – though they do like moisture, lots of sun and an occasional infusion of compost.

Rhubarb is sometimes called the “Pie Plant,” for obvious reasons. But rhubarb isn’t just for pies. In fact, it has the kind of versatility that most other edibles lack, happy in desserts as well as savory dishes, good both cooked and raw, delicate enough to take a supporting role in a recipe, and assertive enough to take center stage.

Though many people wrinkle their noses when contemplating the acidity of rhubarb, especially in its raw state, that acidity is probably rhubarb’s best asset. You might not want to eat rhubarb the way Scandinavians do – by the raw stalk, dipped in sugar – or as Chileans do – by the raw stalk dipped in salt and hot dried chile pepper. But if you think of rhubarb as a substitute for citrus fruits like lemons and limes, or as a balancing ingredient in recipes that feature rich foods like pork and shellfish, you will certainly find dozens of ways to substitute rhubarb into your favorite recipes.

Below you’ll find a few recipes I’ve developed for using rhubarb in savory dishes. The first, Pork Chops with Orange Rhubarb Sauce and Lovage, contains another of spring’s vegetable perennials, lovage. Lovage looks like giant celery and tastes like it looks, which is to say a tiny bit of it imparts a highly concentrated celery taste. Used sparingly, it is a wonderful addition to salads, soups and other dishes. Substitute celery leaves or parsley, if you don’t have any.

The second recipe uses rhubarb juice to partially “cook” fresh scallops, just as lime juice is used in seafood ceviches. The longer the scallops marinate, the more the acid will permeate the delicate flesh, and the less time the scallop will need to heat to be cooked through. If you like, scallops that have been marinated for 4-6 hours can be served cold, without the final cooking step. However, I prefer the lovely contrast the warm scallops create juxtaposed to the cold, crunchy fennel orange salad.

The final recipe is my take on a traditional sauce for oysters, mignonette. Usually mignonette sauce is made by combining red wine vinegar, minced shallots and lots of freshly ground black pepper. Here, to balance the tartness of rhubarb, I’ve substituted a mellow-sweet balsamic vinegar (buy a good one – it’s expensive, but worth it) for the sharper red wine vinegar. The resulting sauce is wonderful, not just on oysters, but with any rich food. I’m particularly fond of it spooned over a slice of crusty bread spread with a triple crème cheese, such as Saint André.

Pork Chops with Orange-Rhubarb Sauce and Lovage

  • 4 boneless pork loin chops (or a small loin roast cut into four slices)
  • salt and pepper
  • 1 tablespoon butter or cooking oil (you may need more if cooking in batches)
  • 2 large shallots or one small onion, minced
  • the juice of 2 large oranges (about 1 cup) and the grated rind of 1 orange
  • 2 cups chopped rhubarb
  • 1/2 cup golden raisins (optional)
  • 2 tablespoons sugar (or to taste)
  • 1/4 cup heavy cream (optional)
  • 1/4 chopped lovage leaves plus lovage sprigs for garnish (you may substitute parsley or celery leaves)

If possible the day before serving, sprinkle both sides of the pork chops with salt and pepper, lay them on a paper towel on a plate, cover with another paper towel and leave in the refrigerator overnight. This dries the outside of the pork and allows it to absorb a bit of salt, which will cause the meat to brown nicely and remain juicy when cooked.

Heat a large skillet over medium heat and melt the butter or heat the oil in it. Add the pork chops to the pan, working in two batches if necessary so as not to crowd the meat. When one side is golden, flip the chop and cook the other side, covering the pan to avoid splatters and to cook the meat more quickly. Thick chops will be done in about ten minutes total. Don’t overdo it, as the chops will be resting in a warm place while the sauce is prepared and will continue to cook from residual heat.

When the chops are cooked, set them aside in a warm spot while making the sauce. Add the shallots to the skillet in which you have cooked the pork – if there’s a lot of fat in the pan from cooking, you may pour most of it off. Or, if there is no fat left in the pan, you may add another pat of butter or bit of oil to it before cooking the shallots. Cook the shallots until they wilt, but don’t brown them.

Add the orange juice to the pan and stir well to scrape up the bits of cooked meat juice from the bottom of the skillet. Add the orange rind, rhubarb and raisins and stir well. Turn the heat down so the rhubarb simmers slowly. When it begins to break down after a few minutes, taste the mixture and add as much sugar as needed to balance the sauce. Stir in the heavy cream, taste again and add salt and pepper to taste.

Divide the sauce between four plates, top each bed of sauce with a pork chop, sprinkle a little lovage over the sauce and garnish the top of the chop with a sprig of lovage. Serve immediately.

Serves 4.

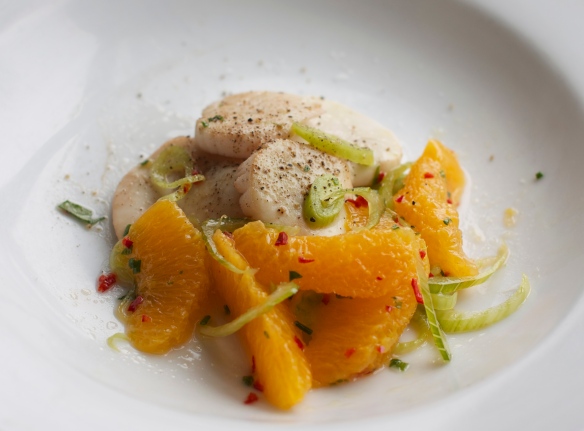
Rhubarb-Marinated Sea Scallops with Orange-Fennel Salad

Rhubarb Marinated Sea Scallops with Orange-Fennel Salad

Rhubarb Marinated Sea Scallops with Orange-Fennel Salad

  • 1/2 pound sea scallops
  • 1/2 pound of rhubarb, cleaned and chopped into pieces
  • 2 tablespoons chopped fresh chives
  • 2 tablespoons chopped fresh parsley
  • 1/4 teaspoon dried hot red pepper flakes (or to taste)
  • 3 tablespoons good quality extra virgin olive oil plus a little more for cooking the scallops
  • 2-3 oranges, skinned and divided into sections
  • 2-3 baby fennel bulbs or 1 regular fennel bulb
  • salt and pepper to taste

Cut the tough piece of white muscle from the scallops (if necessary) and discard. Slice each of the scallops into three thin rounds. Put the rounds into a non-reactive bowl.

In the bowl of a food processor, pulse the rhubarb until it is pureed (you may also use a grater to turn it into a puree). Put the puree into a fine sieve over a bowl and press on it to extract all the juice from it (you may also do this by squeezing the puree with your hands.) You should wind up with about 3/4 of a cup of juice. Pour this over the scallops, cover with plastic wrap and refrigerate for at least an hour or up to 6 hours. Discard the rhubarb solids.

Wash the fennel, then slice it into very thin slivers and toss with the orange segments. Mix together the chives, parsley, olive oil, hot pepper, a little salt and pepper and set aside. Remove the scallops from the refrigerator and drain, discarding the rhubarb juice.

Heat a skillet, add a little oil to it and then saute the scallops over very high heat, less than a minute on each side. The longer they have marinated, the less time they will need to cook.

Arrange the scallops and orange salad on 4 plates, drizzling them with a little of the oil and herb sauce. Serve immediately.

Serves 4 as an appetizer.

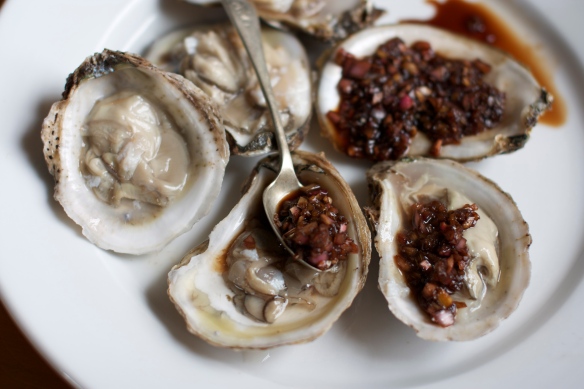
Rhubarb Mignonette Sauce and Oysters

Rhubarb Mignonette Sauce and Oysters

Fresh Oysters with Rhubarb Mignonette Sauce

  • 1/4 cup excellent quality balsamic vinegar
  • 1/4 cup finely minced shallots
  • 1/4 cup finely minced fresh rhubarb
  • plenty of freshly ground pepper (to taste)
  • 1 dozen fresh oysters on the half-shell

Combine all ingredients. Serve chilled on fresh oysters or other raw shellfish. The sauce is also delicious on fresh crusty bread thickly spread with butter or a soft, rich cheese, such as Saint André.

Makes a bit more than 1/2 cup.

The First Peas of Spring – Grilled

grilling peas

grilling peas

I’ve just harvested a basket of the peas I planted in my unheated greenhouse back in February. The variety is called “Coral;” planted outside in spring, they take about two months to produce ripe peas, rather than the three months this batch took.

One nice thing about greenhouse peas is that they get big enough before the sparrows find them that I don’t have to cover them for protection. It took me years to figure out it was sparrows not woodchucks who were eating my newly sprouted peas down to nubs. I had no idea the little beggars could be so destructive.

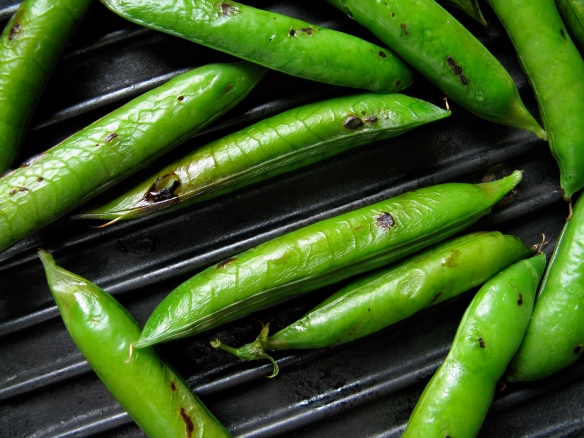
Here’s my favorite way to eat fresh peas: hot from the grill. No need to shell them; diners will do that for themselves. Try serving them as an appetizer while dinner is cooking on the grill. They’re delicious on a warm evening alongside cold, locally brewed ale or with the slightly fizzy, pale green Portugese wine known as Vino Verde. Just be sure to leave a bowl out for the empty pods.

grilled peas

grilled peas

Grilled Peas

(serves 8 as an appetizer)

  • 2 lbs. fresh peas in the shell

Wash the peas and let them sit in a bowl of cold water. If the pods are long enough, you can lay them carefully directly onto the grill; otherwise place them in a single layer in a grill basket made for vegetables (you can also use a grill pan on the stove, if cooking indoors). When the peas have grill marks on one side, (this will take two or three minutes), turn the peas and grill on the other side.

When they’re bright green and steaming (some might pop open), drop them into a bowl and serve. Leave a small pair of scissors or knife out to help guests who don’t want to get too messy snip off the stem-end of the peas (I, glutton that I am, use my teeth). Once the stem is off, simply unzip the string that runs down the pod, and slurp up the hot peas.

Ramps, Asparagus and Dandelion Greens Pizza

ramp, asparagus and dandelion green pizza

ramp, asparagus and dandelion green pizza

The longer I garden, the more I appreciate perennial vegetables. Plant them once, take care of them by weeding, watering and feeding the soil around them with good compost, and they’ll return reliably year after year. Many of these perennials are among the first edibles of spring, which seems to make them taste even more delicious to winter-weary taste buds.

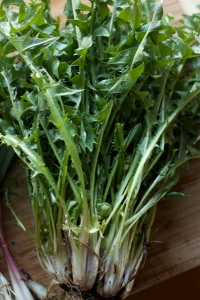
dandelion greens

dandelion greens

Some perennial spring vegetables don’t even require planting. Dandelion greens, chicory, sorrel, and, later in spring, lambs quarters and nettles, are all wild plants that are abundant self-seeders (aka, weeds). All of them are best picked young and tender, before they’ve flowered (with nettles, be sure to wear gloves, to avoid the stinging hairs that are destroyed in cooking).

Many of these “weeds” are so delicious that vegetable breeders have come up with more refined versions sold through seed catalogues. Two of my favorites are super-cold hardy Italian Red Dandelion (it’s actually chicory) and Good King Henry, a member of the weedy Goose Foot family that tastes like spinach and can be harvested from early spring into fall.

Asparagus, unlike perennial weeds, takes a bit of work. It likes lots of good compost and requires watering all summer, or it won’t be productive year after year. Too, you have to keep grass from growing in amongst the shoots, and war with the dreaded asparagus beetle, which can wreak havoc.

One method of achieving both weed and bug suppression is to interplant asparagus with parsley and dill, which can out-compete grass and which asparagus beetles hate. The herbs are also a good use of space, providing a season long crop even after the 4th of July, when good gardeners let their asparagus grow into full, tall ferns to gather energy for next season.

purple asparagus

purple asparagus

It’s not too late to put in an asparagus bed this year, though you won’t be able to harvest any juicy spears until a few seasons have passed and the bed has filled in. Though asparagus can be grown from seed, the most productive plants are male clones (they don’t go to seed) bought as 2 or 3 year-old roots. Two widely available and good choices are “Jersey Supreme” and “Purple Passion.”

ramps and dandelion greens

ramps and dandelion greens

Ramps, if you’ve never encountered them, are a wild native woodland allium, related to both onions and garlic and tasting a bit like both. They’re happy at high, cool elevations, in the kind of moist mixed woodlands where trilliums and golden seal grows beneath maples and beeches, and can completely carpet the early spring forest floor. It seemed likely that ramps would grow around here, but though I scoured our woodlot every spring, I could never find wild ramps growing in it.

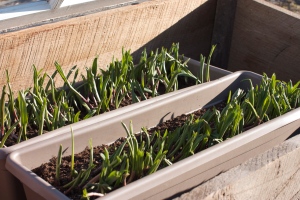
Finally, a few years ago, I took matters into my own hands and ordered a shipment of mature ramps from Ramp Farm Specialties in West Virginia. Owner Glen Facemire only ships his bulbs in February and March (seeds are available all the time), so when he heard that New Hampshire had a big snow storm brewing just as he was putting my ramps in the mail, he gave me a call to talk me through how to care for his “babies” until I could put them in the ground (it turned out that a couple of window boxes in a cold frame did the trick).

ramps in window box and cold frame

ramps in window box and cold frame

The ramps arrived huge and healthy, and now, a few seasons later, are beginning to spread both where I’ve planted them in the woods, and in the more cultivated sections of my garden. They’re particularly happy growing under the shade of the grape arbor. Though you can buy 3 dozen ramps for $24.75, the most economical way to order them is 1000 bulbs for

ramps growing under a grape arbor

ramps growing under a grape arbor

$194.00 (shipping is free). I’d suggest splitting an order with friends and scouting likely locations this summer (you’ll want to try several spots to be on the safe side). Do order early, so you don’t miss out, and be prepared with window boxes and a cold frame, just in case.

Early spring vegetables fresh from the garden don’t need much in the way of preparation. All of them are delicious cooked fast and hot with olive oil or with chopped bacon. They’re also perfect stir fried along with fresh spring chives, a bit of ginger and a little soy sauce combined with water or orange juice. Ramps and asparagus can be lightly tossed in oil, sprinkled with salt and pepper, placed in a grill basket and cooked briefly on the grill.

Below you’ll find a recipe that combines dandelion greens, ramps, and asparagus cooked with bacon as the topping for pizza. Though the pizza dough needs a full day to rise (or overnight in the refrigerator), once it’s ready, the recipe goes together in a snap. Feel free to substitute store-bought dough if you’re short on time. Too, feel free to leave out the bacon if you’re a vegetarian, and to substitute in whatever fresh spring vegetables you have on hand. Spinach or escarole would be delicious.

And if you’re only feeding two people, divide the topping recipe in half. Store the extra pizza dough in the refrigerator in an oiled plastic bag and use it later in the week. It will be good for several days.

Ramp, Dandelion and Asparagus Pizza

for the dough:

  • scant 4 cups flour (can be up to ⅓ whole wheat)
  • ¼ teaspoon dry yeast
  • 1 teaspoon fine sea salt (can be up to 2 teaspoons, if desired)
  • 1½ – 1¾ cups water (if your water is chlorinated, use spring or filtered water)

for the topping:

  • 4 slices thick bacon, cut into ½ inch chunks
  • 1 large bunch dandelion greens (about ½ pound), trimmed of roots, well washed in cold water and chopped
  • 1 large bunch ramps (about 10), trimmed of roots, well washed and chopped; or use 6 large cloves of garlic, peeled and chopped
  • 1 large bunch asparagus (about 1 pound or more), trimmed, washed and chopped
  • 1½ pounds fresh mozzarella, broken up into chunks
  • hot red pepper flakes, salt and black pepper, to taste
  • good olive oil for drizzling

For the dough, combine all the dry ingredients in a large bowl. Add the water (you will need the larger amount if using whole wheat flour) and stir well with a spoon until well combined – do not knead. If the mixture seems too dry (it should be quite sticky), add a little more water to incorporate all the flour.

Cover with plastic and set on a cool counter to rise. If it is very warm or you’d like to use the dough more than 18 hours later, place in the refrigerator. Allow the dough to rise until doubled – if it’s warm this will happen in about 12 hours, if it’s very cool, in about 18 hours.

When ready to make the pizza, preheat the oven to 450-500 degrees (my oven doesn’t go to 500 – use the higher heat if you can). If you have a pizza stone, place it on the top rack.

Divide the dough into 4 balls. Lightly oil them with olive oil, cover them with plastic and set aside on the counter to rise and soften while make the topping.

Heat a large skillet and add the bacon if using (otherwise, heat a tablespoon of olive oil in the pan and continue with the greens, below). Cook the bacon until it is beginning to brown. Remove the bacon from the pan, pour off most of the fat, and return the skillet to the heat. Add the dandelion greens, ramps or garlic, asparagus and bacon pieces, if using. Cook, stirring, until the greens are wilted and tender. Season to taste with hot red pepper, black pepper and salt (you may not need any salt, depending on the bacon). Remove the greens from the pan and set aside.

Turn the oven to broil to super-heat the pizza stone. If you don’t have a pizza stone, place a large aluminum sheet tray in the oven to heat (do not use a tray that has a non-stick coating as it will burn).

Stretch the dough either by rolling with a rolling pin (you’ll need to use flour to keep the dough from sticking) or with your hands to a very thin, approximately 12-inch rough circle. Place the round on a well floured pizza peel (if you have one), or onto the back of a well floured aluminum sheet tray. Cover the dough to within about 1 inch of the edge with ¼ of the greens and then ¼ of the mozzarella (leave spaces between the pieces of cheese). Drizzle the pizza with a little olive oil.

Open the oven door and slide the pizza from the peel onto the pizza stone. If you are not using a pizza stone, carefully remove the hot sheet tray from the oven, sprinkle it with a little flour, then slide the pizza from the overturned sheet tray onto the hot sheet tray and return it to the oven.

The pizza will cook very quickly – in about 2-4 minutes, depending on your oven. If the pizza begins to burn (a few black spots are desirable, but not an over-all char), turn the broiler off, but leave the oven temperature at 450-500 degrees.

You may need to slide a spatula under the pizza and turn it, or turn the sheet tray, so that it cooks evenly. It is done when the edges are well browned, and black in spots. Remove from the oven, slide onto a cutting board, and cut up and serve immediately.

Repeat with the other three pieces of dough. Serves 4 generously.